
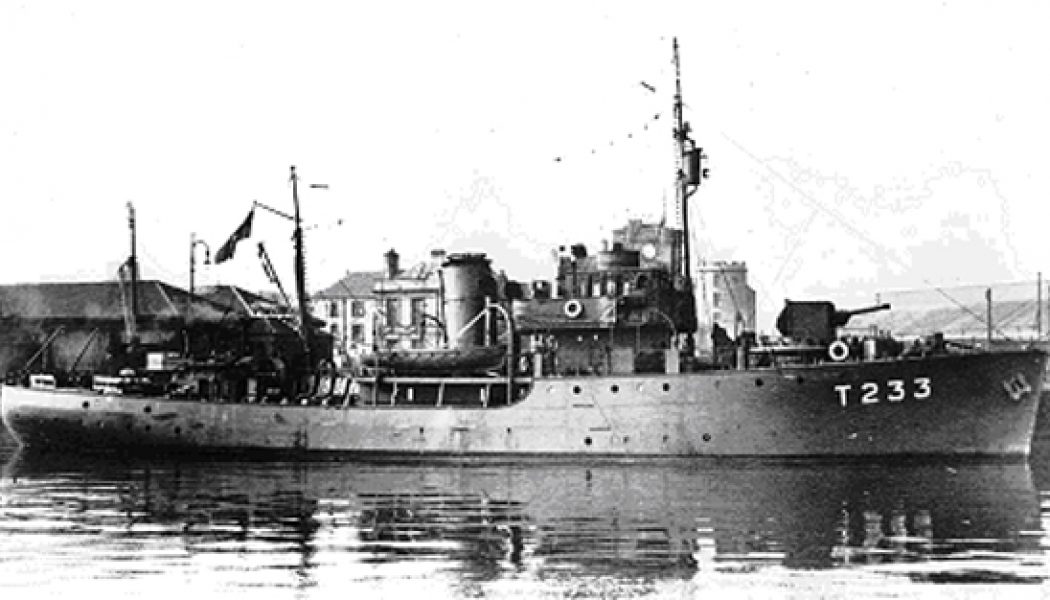
By early 1943 the battle for Guadalcanal was in full swing. Japan was supplying its forces on the island by night, often by submarine. United States forces were supported by New Zealand and Australian ground, air and naval units, which included the three Bird-class ‘pocket corvettes’,[1] Kiwi, Tui and Moa, that New Zealand had ordered in 1939. They were small warships by any measure – even at full load their displacement was around 900 tons.[2] They were based on a British trawler design adapted to minesweeping and anti-submarine work, capable of 13-14 knots.[3] Their primary surface armament was a single 4-inch gun, supplemented by a variety of lighter weapons such as the 20-mm Oerlikon that Kiwi’s crew salvaged from a wrecked US vessel in mid-January 1943, which was mounted at the bow with help from the ‘Seabees’.[4]
Kiwi and Moa were on patrol northeast of Guadalcanal on the night of 29-30 January 1943 when they encountered the 2,135/2,791 ton Type J1 ‘cruiser’ submarine I-1,[5] which was taking troops and supplies to the garrison on the island.[6] The Japanese boat, under Lieutenant Commander Eiichi Sakamoto, displaced more than the minesweepers combined, and had a surface speed of 18 knots. Its armament had been modified during conversion to the cargo role,[7] and consisted of a 125-mm gun, a 6-pounder and two machine guns, making the submarine a serious surface threat to the tiny New Zealand vessels.[8]
It was a dark night and the first hint of trouble came when Leading Seaman E. C. McVinnie of HMNZS Kiwi picked up the submarine on his hydrophones.[9] He switched on the ASDIC (the British equivalent of ‘sonar’) and immediately heard an echo from the Japanese boat.[10]
The two New Zealand ships had the edge while the submarine was submerged, and Kiwi – under Lieutenant-Commander Gordon Bridson (1909-1972)[11] – steamed over the track and dropped six depth charges. One observer on deck saw the phosphorus wake of the submerged boat.[12] These blasts sent I-1 crashing down to the bottom, damaging her forward torpedo rooms. Kiwi swung about and made another run, this time dropping charges so close to her own stern that the blast from one popped rivets and set the ship’s steam siren going.[13]
The New Zealanders lost ASDIC contact, but Kiwi made a third run and this time the Japanese submarine boiled to the surface.[14] The damage to his torpedo tubes and propulsion meant Sakamoto had no option but to try and escape on the surface and, if necessary, engage with his guns. Kiwi scored a hit on her third round.[15] The Japanese shells passed over Moa with a sound that one observer compared to an express locomotive through a tunnel,[16] but the small-arms fire fatally wounded 22-year old [17] Acting Leading Signalman Campbell Howard Buchanan.[18] He nonetheless stayed at his post and continued to operate a searchlight, illuminating the Japanese boat while Kiwi’s 20mm Oerlikon swept the submarine’s deck, stifling the Japanese fire.
Bridson now realised he was less than 400 metres from the Japanese boat and in a position to ram. He signalled Moa to hold fire and swung Kiwi about, slamming into I-1 abaft the conning tower, while every gun that could bear poured fire into the Japanese vessel at point-blank range, raking the landing craft strapped to the submarine’s deck, silencing the deck gun, and killing Sakamoto.
Bridson rang down for full astern, and Kiwi pulled clear. The attack had apparently holed the Japanese boat, preventing her diving again.[19] Moments later Bridson ran his ship in a second time, this time colliding with I-1’s stern. Again the minesweeper pulled away in a flurry of foam. Bridson circled for a third attempt. This time Kiwi ran up on the submarine’s deck and canted over, rupturing the Japanese boat’s oil tanks and starting a small fire.[20] The I-1’s First Lieutenant and the boat’s navigating officer, a third-dan Kendo swordsman, tried to board with swords, but were unable to do so before Kiwi pulled clear.

Creative Commons Attribution (CC-BY) 4.0 International Licence
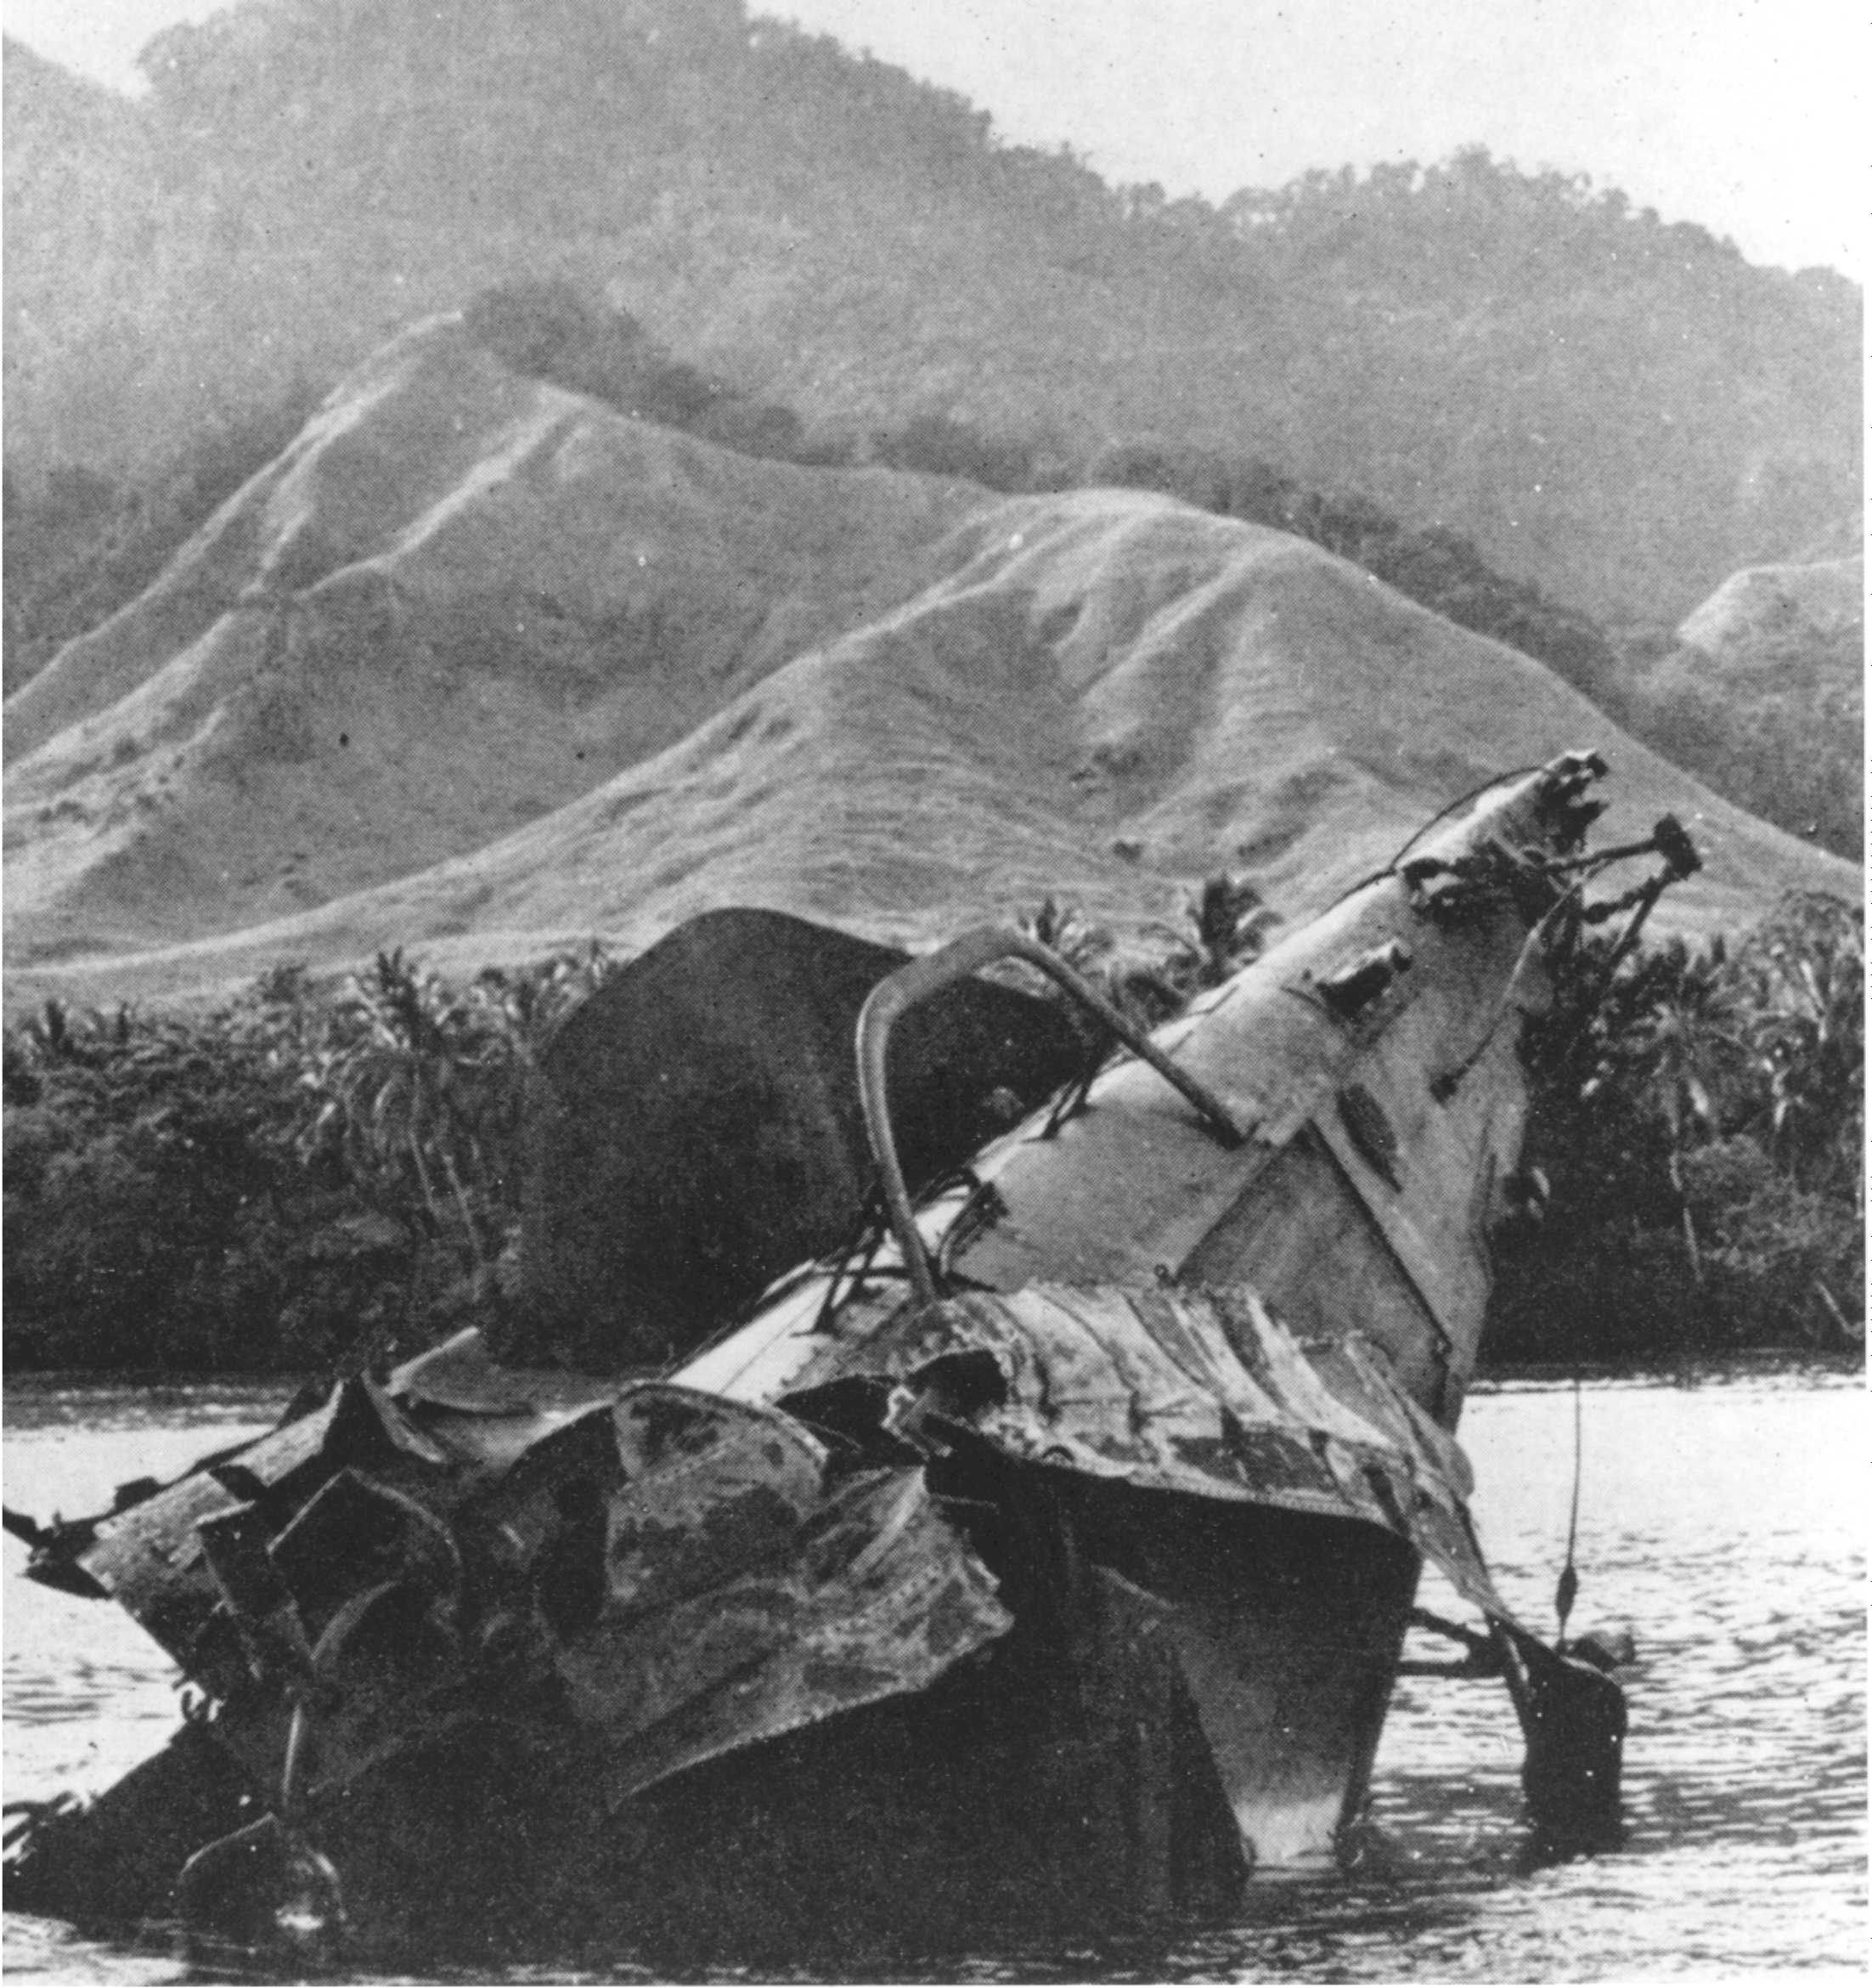
By now Kiwi’s 4-inch gun had overheated and her ASDIC was out of action, so Bridson pulled clear to let Moa pour fire into the crippled Japanese vessel.[21] The I-1 was making about 12 knots, now under its executive officer, Lieutenant Koreeda Sadayoshi. A chase developed in which the Japanese engaged with their stern 6-pounder, and the submarine ran aground on a reef in Kamimbo Bay.[22] Moa stood off the submarine until dawn, reopening fire on the wreck and killing one man. Another was rescued. He knew English and told his captors that he regarded his fate as a disgrace.[23] However, the light revealed the New Zealand vessel to Japanese artillery ashore; she came under fire and had to depart. Some 55 men escaped from the wrecked I-1;[24] others were found dead inside by US divers.[25]
The Americans found vital intelligence on board, including code books, charts and manuals,[26] recovering them despite Japanese efforts to bomb the wreck and prevent the compromise of their codes. This forced Japan to switch to a less secure reserve code; and one of the serendipitous outcomes was that the United States was then able to decode signals in April that enabled aircraft of the 339th Fighter Squadron to intercept Admiral Yamamoto’s flight from Rabaul to Ballale airfield. He and his staff were killed.
The wreck of I-1 was damaged by Australian treasure-hunters in 1970, but remained dive-able at least into the 1990s and later.[27] The 125-mm deck gun was retrieved and stands outside the RNZN Museum at Torpedo Bay in Auckland.
It had been a remarkable battle fought – like many of the smaller encounters of that theatre – at ranges more typical of the age of fighting sail. The two New Zealand ships had expended 58 rounds of 4-inch ammunition between them, scoring 17 definite hits and up to seven ‘probables’. They had also expended around 1,259 rounds of Oerlikon ammunition and around 3,500 from small-arms.[28]
New Zealand losses amounted to one dead and significant damage to Kiwi’s bow. She had to be withdrawn from theatre for repairs in Auckland. However, Moa – now joined by Tui – returned to patrol the next night, 1 February, and found Japanese landing craft inshore near Cape Esperance.[29] A Japanese shell passed through the sighting aperture of Moa’s 4-inch gun shield, but Tui returned the fire and sank one of the landing craft. It was, it seemed, all in a night’s work.[30]

For more on the Solomons Campaign and the Pacific war, check out Pacific War: New Zealand and Japan 1941-45, available from Amazon.
Copyright © Matthew Wright 2019
[1] Displacement given at https://nzhistory.govt.nz/war/bird-class-minesweepers/pocket-corvettes
[2] http://navymuseum.co.nz/wwii-campbell-buchanan-and-the-sinking-of-japanese-submarine-i-1/
[3] http://navymuseum.co.nz/hmnzs-kiwi-moa-bird-class-corvettes/
[4] RNZN Museum Oral History DLA 0098, Leading Seaman E. C. McVinnie.
[5] For particulars see http://www.combinedfleet.com/type_j1.htm
[6] S. D. Waters, The Royal New Zealand Navy, War History Branch, Department of Internal Affairs, Wellington, 1956, p. 307.
[7] http://www.combinedfleet.com/type_j1.htm
[8] See http://navymuseum.co.nz/wwii-campbell-buchanan-and-the-sinking-of-japanese-submarine-i-1/ – note that these particulars differ from those given in Waters, p. 309.
[9] Wright, Blue Water Kiwis, p. 124.
[10] RNZN Museum Oral History DLA 0098, Leading Seaman E. C. McVinnie.
[11] http://www.aucklandmuseum.com/war-memorial/online-cenotaph/record/C120961
[12] RNZN Museum Oral History DLA 0098, Leading Seaman E. C. McVinnie.
[13] RNZN Museum Oral History DLA 0098, Leading Seaman E. C. McVinnie.
[14] Matthew Wright, Blue Water Kiwis, Reed, Auckland 2001, p. 124.
[15] Waters, p. 307.
[16] RNZN Museum Oral History DLB0004 Yeoman of Signals J. L. W. Salter BEM, MID, RNZNVR (Rtd).
[17] http://www.nzdf.mil.nz/news/media-releases/2018/20180126-anniversary-of-famous-destruction-of-japanese-submarine-by-new-zealand-ships.htm
[18] Waters, p. 307.
[19] Waters, p. 308.
[20] Wright, Blue Water Kiwis, p. 124.
[21] Waters, p. 308.
[22] Wright, Blue Water Kiwis, p. 124.
[23] RNZN Museum Oral History DLB0004 Yeoman of Signals J. L. W. Salter BEM, MID, RNZNVR (Rtd).
[24] http://www.nzdf.mil.nz/news/media-releases/2018/20180126-anniversary-of-famous-destruction-of-japanese-submarine-by-new-zealand-ships.htm- note that this casualty figure differs from Waters.
[25] Waters, p. 309.
[26] http://www.combinedfleet.com/type_j1.htm
[27] https://www.michaelmcfadyenscuba.info/viewpage.php?page_id=373
[28] http://navymuseum.co.nz/wwii-campbell-buchanan-and-the-sinking-of-japanese-submarine-i-1/, see also Waters, p. 309.
[29] Wright, Blue Water Kiwis, p. 124.
[30] Waters, pp. 309-310.

Recent Comments